
How to Extract text from screenshots with Snipping Tool
Unlocking Advanced Features in the Snipping Tool on Windows 11
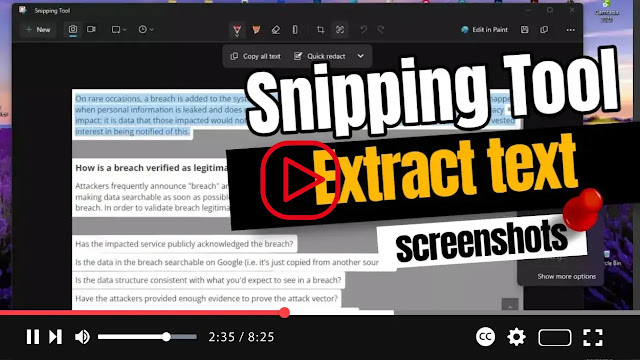
Greetings, Windows 11 users! Did you know that the Snipping Tool just got even more powerful with the latest update? Now, not only can you capture screenshots with precision, but you can also leverage OCR (Optical Character Recognition) technology to extract text from your screenshots. This groundbreaking feature opens up a world of possibilities, allowing you to copy text from images and redact sensitive information before sharing them. In this guide, we'll walk you through the steps to extract text from screenshots using the enhanced Snipping Tool.
Here's how to make the most of this feature:
- Open the Snipping Tool on your Windows 11 device.
- Click on the "Snip" button to initiate the snipping process.
- Next, click on the "New" button to select the snipping mode that best suits your needs.
- Capture the screenshot by selecting the desired area of the screen.
- Once the screenshot is captured, hover over the text you wish to extract.
- Right-click on the selected text and choose the "Copy text" option from the context menu.
- Voila! The text from your screenshot is now copied to your clipboard and ready to be pasted into any document, text file, online post, or wherever else you need it.
But wait, there's more! For even greater convenience, you can choose to extract all the text from the screenshot at once. Simply click on the "Text actions" button and select the "Copy all text" option. This way, you can quickly capture all the text from your screenshot in one go.
.webp)
With the enhanced Snipping Tool on Windows 11, you have the power to effortlessly extract text from images, making it easier than ever to redact sensitive information and share important insights with others.
Try out this feature today and streamline your workflow with the Snipping Tool's advanced capabilities!
.webp)
About AAN Creation
No comments
Post a Comment